


Some time ago, my eldest son decided to make glow-in-the-dark pigments by doping strontium aluminate with rare earth elements. After a bit of trial and error, he succeeded — and the relative simplicity of the process made me wonder if there are any naturally-phosphorescent materials in our homes.
Of course, we’re not surrounded by items that exhibit strong and long-lived phosphorescence. Still, perhaps the effect is too faint or too brief to see with a naked eye? The internet offered no good answers, so I decided to investigate on my own.
Spoiler: the results so far are less exciting than you might be hoping for. Keep reading for the journey, not for the big reveal!
In theory, the idea was simple: place samples in a lightproof container, shine a UV light on them for a while, and then measure any residual glow with a photodiode circuit — as discussed in one of the recent posts.
The main gotcha is the inherent trade-off between sensitivity and response speed. A photodiode with a large active area is more sensitive, but has a high junction capacitance, making it harder to capture short-lived events. In contrast, a small photodiode is fast, but needs more amplification; faint readings are more easily drowned out by noise.
Based on a gut feeling, I decided to go for speed: I figured I want to be able to measure down to a microsecond, so I bought a Marktech MT03-023 photodiode with a 1.2 mm² die and a 20 pF junction capacitance. I then constructed the test chamber from a small tin can, drilling five holes in the lid: one for a photodiode, and four for standard 385 nm UV LEDs (VAOL-5GUV8T4):
I picked this particular photodiode because it has a high sensitivity for its size. In contrast to run-of-the-mill photodiodes, it also boasts better-than-usual response on the blue-green end of the visible spectrum:
Regular readers might recall that the bandwidth of operational amplifiers is derated proportionally to the desired amplification. It follows that to measure microsecond-range phosphorescence at the very high gain needed for a photodiode, I needed to start a high-speed amplifier.
I scoured my parts bin and picked TLV3541 — a neat if somewhat finicky rail-to-rail op-amp with fGBP = 200 MHz:
The fundamental architecture is the same as outlined in a recent article on photodiodes, so I won’t repeat all the details. In brief, it’s a transimpedance amp that produces an output voltage proportional to diode photocurrent times 220,000 (i.e., 10 µA becomes 2.2 V). There is also a small offset (130 mV) added to keep the op-amp linear.
With a generous allowance for parasitic capacitance on the input pin, the estimated cutoff frequency of this circuit is:
\(f_c = \sqrt{f_{GBP} \over {2 \pi \cdot R_f \cdot C_{in}}} = \sqrt{{220 MHz} \over {2 \pi \cdot 220 k\Omega \cdot 25 pF}} \approx 2.5 MHz\)
After the initial amplification, the signal goes through a passive RC lowpass filter. The purpose of the filter section is to get rid of any residual high-frequency noise, which might show up due to radio interference and thermal fluctuations in the feedback capacitor.
Next, the signal is routed to a second stage that adds another 20x gain using a more mellow op-amp (OPA322, fGBP = 20 MHz). The result is then shipped off to a 14-bit, 1 Msps analog-to-digital converter, MCP33151-10:
After ordering the ADC, I noticed that it required an additional 1.8 V supply at about 1 mA. This can be handled with a simple three-terminal linear regulator (MCP1700-1802), adding about $0.50 to the project’s price tag.
Short wires and PCB traces are quite capable of picking up high-frequency radio interference. The resulting tiny voltages and currents usually go unnoticed, especially in digital circuits — but in this particular design, a combination of high gain and high bandwidth is a recipe for pain.
I expected trouble from the get go, so I started with careful supply filtering. As shown earlier, the analog supply (AVdd) is protected with a beefy ferrite bead sandwiched in between bulk capacitors, with additional low-ESR caps directly next to each chip.
In the same vein, I took care to keep all the wires short as feasible to reduce radio pickup. I also connected the photodiode via a twisted pair to make sure that any induced currents would largely cancel out. The lowpass filters, as discussed earlier, were supposed to keep the noise in check too.
I soon found out that these precautions were not enough; I was still getting around 200 mVp-p of noise on the output — or more if I stood near:
To solve the problem, I had to place the amplifier itself in another tin can, soldering both cans together and bonding them to circuit ground, and then routing the photodiode wires within this protected enclosure. The trick worked fine; here’s the resulting waveform:
The trace also shows the output signal has a roughly 1 µs rise and fall time, so we are within my original, gut-based design spec.
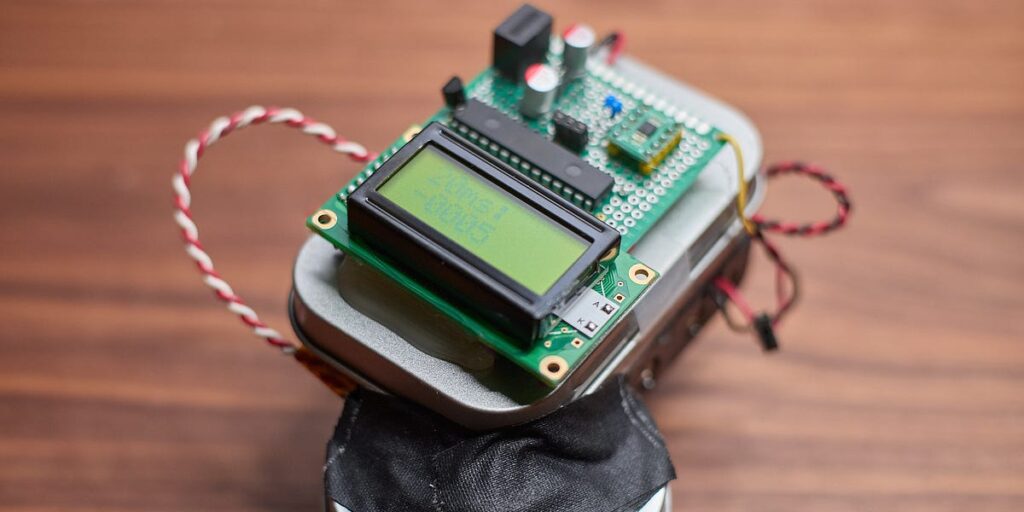
Compared to dealing with high-speed analog signals, the digital side of the circuit is straightforward. I’m using an AVR Dx series microcontroller running at 24 MHz to talk to the ADC over the serial peripheral interface (SPI). The MCU is also connected to a text-based LCD that follows the common Hitachi HD44780 protocol over an 8-bit parallel bus:
The only other feature of note is a small n-channel MOSFET (2N7000) that controls the UV LEDs. I picked this transistor because it has a low gate capacitance, allowing the LEDs to be turned off nearly instantaneously. A bulkier MOSFET driven by an MCU output pin would take unacceptably long to respond.
The software side is largely unremarkable; it performs basic calibration to establish the baseline, toggles the LEDs for a couple of seconds, and then runs conversions at hardcoded intervals (2 µs, 10 µs, 100 µs, 1 ms, 2 ms, 5 ms, 7 ms, 10 ms, 20 ms).
Well, OK: a cute trick is used to rapidly acquire multiple samples and improve accuracy through averaging. A naive approach to averaging would be to turn the LED on for a couple of seconds to fully “charge” the material, turn the light off, take one set of readings, and then start over. That said, the repeated multi-second charging cycles would make the process take forever.
Instead, my algorithm performs a single full “charging” round, and then starts pulsing the LED on and off: for example, to get the 2 µs average, it repeatedly turns the LED off for 2 µs, performs an ADC conversion, and then turns the diode back on for 1 ms. In this process, the UV source is still effectively on 99.8% of the time, there’s no real need to recharge the specimen over and over again.
The calculation of the average is mildly interesting, too. Normal averaging (arithmetic mean) is easily skewed by individual outlier readings caused by strong pulse-like RFI noise — nearby cell phones, motors, etc. To mitigate this problem, my code records all the ADC acquisitions, sorts the values, and then picks a band of n elements centered around the midpoint of the buffer. The case of n = 1 is the median, but n > 1 can improve resolution at no cost.
I first tested the circuit with a plastic glow-in-the-dark trinket dyed with zinc sulfide. The measurements are shown below:
Neat. Although the object glows in the dark for a good while, the intensity of the effect already decays exponentially on a sub-millisecond scale.
After this, I scoured the kitchen for test materials. I tested a fair amount of condiments, with no meaningful readings on most — even the ones that visibly fluoresce in UV. One of the finds that exhibited pretty strong phosphorescence was powdered milk:
The plot is quite similar to the earlier one, but the effect is about two orders of magnitude weaker; the glow is actually visible with a naked eye, but only in total darkness and only for about a second after hitting the material with a UV beam.
Another unexpected glow-in-the-dark foodstuff? Gelatin! It initially registers about 30% higher than powdered milk, but decays more quickly. Based on these results, I’d wager than animal proteins are more promising than plant-based goods.
Elsewhere in the home, in my kids’ mineral collection, an unassuming chip of natural ruby exhibited surprisingly strong phosphorescence — yielding an ADC reading of about 2,000 at the 100 µs mark, then decaying to almost nothing at 20 ms.
According to the internet, some nuts glow in the dark for a brief while, although an experiment with an oddball jar of almond butter didn’t yield a good reading. I have a couple of theories why, and the most obvious tweak is to add a more powerful UV source in place of the four small LEDs. I already sunk too much time into this project… so what’s another day or two?
Premium IPTV Experience with line4k
Experience the ultimate entertainment with our premium IPTV service. Watch your favorite channels, movies, and sports events in stunning 4K quality. Enjoy seamless streaming with zero buffering and access to over 10,000+ channels worldwide.